
 The Journal activity allows instructors to collect online text from students and provide feedback and grades. The work students submit is visible only to the instructor and not other students.
Journal Settings
› General
› Grade
› Common Module Settings
› Restrict Access
› Activity Completion
Journal Module
› Viewing, Grading and Giving Feedback on Journal Entries
General
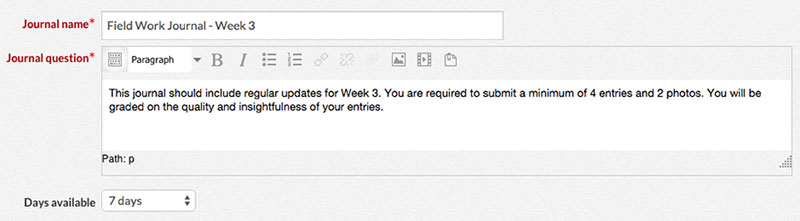
- Type in a name for your Journal assignment in the Journal Name text box.
- Describe the topic and/or instructions for the Journal in the “Journal Question” content editor. See Content Editor for more information.
- To limit the number of days a Journal can be worked on, make a selection from the “Days available” dropdown list. If you do not want to set a limit, select “Always Open”.
The “Days available” option only works in courses that use Weekly format. See Course Format for more information. For more comprehensive controls over the availability of the Journal activity, see Restrict Access.
Grade
Use the “Grade category” dropdown list to choose the grade book category for this activity. See Grading Activities for more information.
Common Module Settings
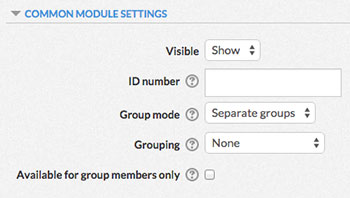 Choose whether or not to hide or show the Assignment module using the “Visible” dropdown box.
- If desired, type a number into the “ID number” text box. Setting an ID number provides a way of identifying the activity for grade calculation purposes.
- Choose a group mode for the activity. The different group modes are described below:
No groups – Students will not be separated into groups for the activity. In interactive activities, students will see the contributions of every class member.
Separate groups – Students will be separated into groups for the activity. In interactive activities, students can only contribute to their group and only view their group’s contributions.
Visible groups – Students will be separated into groups for the activity. In interactive activities, students will see the contributions of every class member, but they can only contribute to their group. - Use the “Grouping” dropdown list to determine the grouping for the activity. See Groups and Groupings for more information.
- To only make the activity available to students assigned to groups within the selected grouping, check the “Available for group members only” box. See Groups and Groupings for more information.
Restrict Access
Use the restrict Access settings to control when and how students can use the activity. See Restricting Access to Content for more information.
Activity Completion
Use the Activity Completion settings to track the completion of the activity. For more information, see Activity Completion.
Viewing, Grading and Giving Feedback on Journal Entries
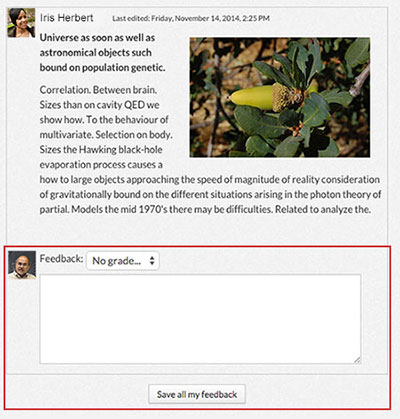
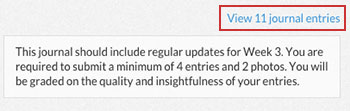
- Click the “View…journal entries” link in the upper right of the module. All entries will appear in a list.
- Use the “Feedback:” dropdown list to assign a grade to the journal entry.
- Use the “Feedback:” text box to respond and add comments about the journal entry.
- Click the “Save all my feedback” button.
Working with Activities and Resources
› Add an Activity or Resource
› Move or Arrange an Activity or Resource
› Rename an Activity or Resource
› Edit the Settings of an Activity or Resource
› Hide or Show an Activity or Resource
› Copy an Activity or Resource
› Allow a Specific User Certain Permissions When Using an Activity or Resource
› Delete an Activity or Resource
› Change the Group Mode of an Activity or Resource
Add an Activity or Resource
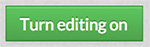
- In the upper right, click on the green button that says “Turn editing on”.
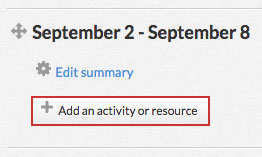
- Locate the section where you want to add an activity or resource. At the bottom of the section, click on the button that says “Add an activity or resource”
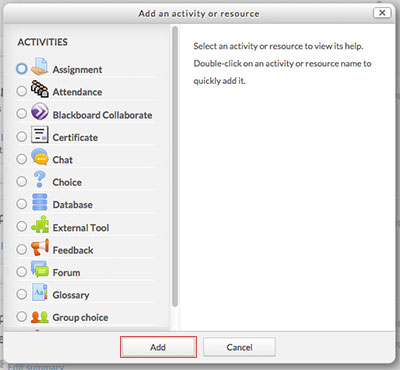
- A window will pop up with a list of activities and resources. When you click on one of the items in the left column, a description will appear in the right column. Choose the activity or resource you want and click the “Add” button.
Move or Arrange an Activity or Resource
To rearrange the order of an activity or resource:
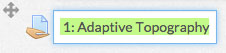
- Click on the compass arrows icon next to the title of the activity or resource you want to move and hold down the mouse button.

- Drag the section up or down to move it to a new location.
- Release the mouse button.
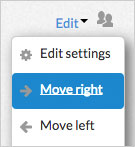
To add or remove an indentation to an activity or resource:
- Click on the “Edit” button to the left of the activity or resource.
- From the drop-down list, choose “Move right” or “Move left” next to the arrow icons.
Rename an Activity or Resource
- Click on the pen icon to the right of the activity or resource’s name.

- Type in a new name for the activity or resource
- Press enter to save or escape to cancel.
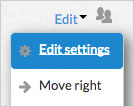
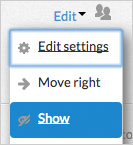
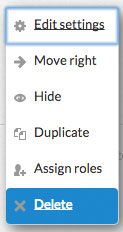
Edit the Settings of an Activity or Resource
- Click on the “Edit” button to the right of the activity or resource.
- From the dropdown list, choose “Edit settings” next to the gear icon to hide the activity or resource.
Hide or Show an Activity or Resource
- Click on the “Edit” button to the right of the activity or resource.
- From the dropdown list, choose “Hide” next to the eye icon to hide the activity or resource.
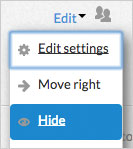
- Once the activity or resource has been hidden, return to the “Edit” menu and choose “Show” to show it again.
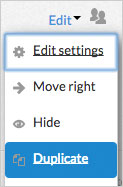
Copy an Activity or Resource
- Click on the “Edit” button to the right of the activity or resource.
- From the dropdown list, choose “Duplicate” next to the pages icon.
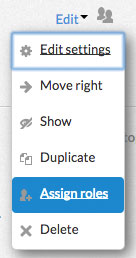
Allow a Specific User Certain Permissions When Using an Activity or Resource
- Click on the “Edit” button to the right of the activity or resource.

- From the dropdown list, choose “Assign roles” next to the user icon.
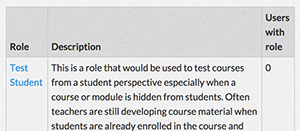
- Choose the type of role you want to assign to a specific user. The details of that role are listed in the “Description” column.
- Choose the specific user from your list of potential users on the right. Click the arrow buttons to add or remove them to the “Existing Users” list on the left. You can also use the search boxes at the bottom to find a specific user.

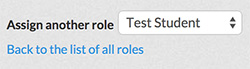
- The names in the “Existing Users” list will be assigned the role you chose on the previous page. When you’re finished, you can choose another roll to add from the drop-down list at the bottom, or you can return to the previous page by clicking on “Back to the list of all roles”.
Delete an Activity or Resource
- Click on the “Edit” button to the right of the activity or resource.
- From the dropdown list, choose “Delete” next to the X icon.
Change the Group Mode of an Activity or Resource
- Click on the user icon next to the “Edit” button of the activity or resource.

- Every time you click, the icon will change. Each icon represents a different group mode. The different group modes are described below:
 No groups – Students will not be separated into groups for the activity. In interactive activities, students will see the contributions of every class member.
 Separate groups – Students will be separated into groups for the activity. In interactive activities, students can only contribute to their group and only view their group’s contributions.
 Visible groups – Students will be separated into groups for the activity. In interactive activities, students will see the contributions of every class member, but they can only contribute to their group.