
The Database activity allows you and your students to build, display and search a collection of records on any topic. Databases can store almost anything, including images, files, links and text.
Database Settings
› General
› Entries
› Availability
› Ratings
› Common Module Settings
› Restrict Access
› Activity Completion
Database Module
› Set Up a Database
› Using Presets
› Change the Appearance of a Database
› Add an Entry
› View and Edit Multiple Entries
› View and Edit Single Entries
› Search a Database
› Export Data to a Spreadsheet
General
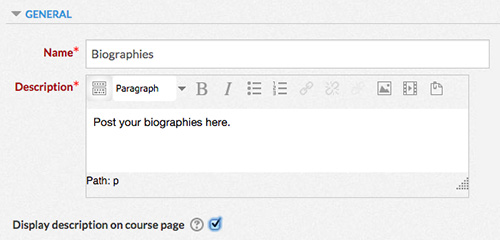
- Type a name for your database into the “Name” text box.
- Type a description of your database in the “Description” text box. If students will be required to submit database entries as part of their coursework, this is a good place to provide them with instructions and set expectations.
- Check “Display description on course page” if you want the description to show on the course page.
Entries
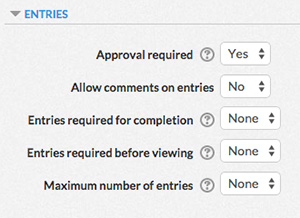
- Use the “Approval required” dropdown list to choose whether students must have their submissions approved before they are viewable in the database.
- Use the “Allow comments on entries” dropdown list to choose whether comments can be posted to entries in the database.
- Use the “Entries required for completion” dropdown list to determine the number of entries a student is required to submit before the activity can be considered complete.
- Use the “Entries required before viewing” dropdown list to determine the number of entries a student is required to submit before they can view entries from other students.
- Use the “Maxiumum number of entries” dropdown list to determine the maximum number of entries that a student is allowed to submit.
Availability
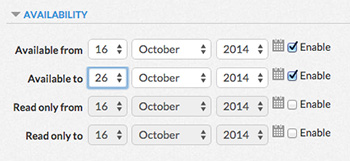
- Check the “Enable” box and use the “Available from” dropdown lists to determine the date that students can begin viewing the database.
- Check the “Enable” box and use the “Available to” dropdown lists to determine the date that students can no longer view the database.
- Check the “Enable” box and use the “Read only from” dropdown lists to determine the date that students can begin adding entries to the database. They will still be able to view entries before this date.
- Check the “Enable” box and use the “Read only to” dropdown lists to determine the date that students can no longer add entries to the database. They will still be able to view entries after this date.
Ratings
Ratings can be assigned to database submissions as a way of grading them.
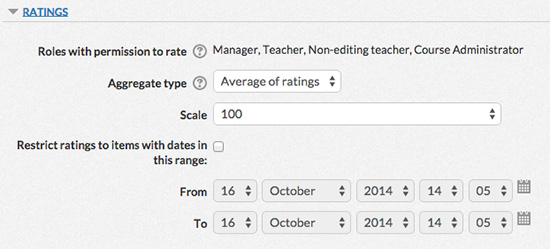
- Use the “Aggregate type” dropdown list to determine how ratings are used to form the final grade in the gradebook. The aggregate types are defined below:
No ratings – Activity will not appear in the gradebook
Average of ratings – The mean of all ratings is used as the final grade.
Count of ratings – The number of rated items is used as the final grade. Note that the total cannot exceed the maximum grade for the activity.
Maximum – The highest rating is used as the final grade
Minimum – The smallest rating is used as the final grade
Sum – All ratings are added together. Note that the total cannot exceed the maximum grade for the activity. - Use the “Scale” dropdown list to determine the grade scale. See Scales for more information.
- Check the “Restrict ratings to items with dates in this range” box if you only want to create a grade from ratings within a certain time period, then use the “From” and “To” dropdown lists to determine the time period.
Common Module Settings
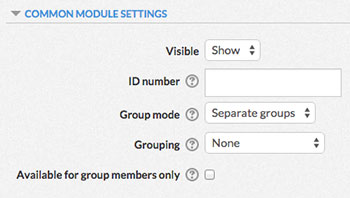 Choose whether or not to hide or show the Assignment module using the “Visible” dropdown box.
- If desired, type a number into the “ID number” text box. Setting an ID number provides a way of identifying the activity for grade calculation purposes.
- Choose a group mode for the activity. The different group modes are described below:
No groups – Students will not be separated into groups for the activity. In interactive activities, students will see the contributions of every class member.
Separate groups – Students will be separated into groups for the activity. In interactive activities, students can only contribute to their group and only view their group’s contributions.
Visible groups – Students will be separated into groups for the activity. In interactive activities, students will see the contributions of every class member, but they can only contribute to their group. - Use the “Grouping” dropdown list to determine the grouping for the activity. See Groups and Groupings for more information.
- To only make the activity available to students assigned to groups within the selected grouping, check the “Available for group members only” box. See Groups and Groupings for more information.
Restrict Access
Use the restrict Access settings to control when and how students use the database. See Restricting Access to Content for more information.
Activity Completion
Use the Activity Completion settings to track the completion of the activity. For more information, see Activity Completion.
Set Up a Database
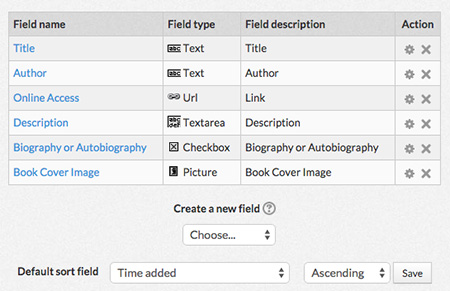
The first thing you’ll need to do in the Database module is set up your database to accept information. Information is entered into the database through a form that you create. Forms are made up of different fields.
- Click on the “Fields” button at the top right of the module.
- Use the “Create a new field” dropdown list to choose which type of field you want to add. The different fields are described below.
Checkbox – Checkboxes are options that can be either “checked” or “unchecked”. If “checked” when an entry is created, the text of the option will appear on the entry when viewed.
Date – The date field will provide dropdown lists for month, day and year when an entry is created.
File – The file field will provide a file uploader when the entry is created. See File Uploader for more information.
Latlong – The latitude/longitude field allows geographic coordinates to be added when an entry is created. If a “Link-out” service is chosen for the field, the coordinates will link to that service when the entry is viewed.
Menu – The menu field is similar to the checkbox, except rather than provide a checkbox for each option, the options are selected from a dropdown list.
Multimenu – The multimenu field is similar to the checkbox, except rather than provide a checkbox for each option, the options are selected from a list. Multiple options can be selected at one time by holding down the shift key while clicking.
Number – The number field allows you to add a number to each entry.
Picture – The file field will provide a file uploader for images when the entry is created. See File Uploader for more information. When using the picture field, you have the option of automatically resizing images for both list view and single view. To re-size images, enter the width and height (in pixels) for each view.
Radio button – The radio button field is similar to the checkbox, except radio buttons are provided for each option rather than checkboxes. This means only one selection can be made at a time.
Text area – The text area field provides a content editor when an entry is created. See Content Editor for more information.
Text input – The text input field provides a box for entering a single row of text.
URL – The URL field provides an area to enter a link to a web page. - Once you’ve created a field, it will be added to a table above the “Create a new field” dropdown list. In the “Action” column of the table, use the Gear icon to edit the field or the X icon to delete it.
- Use the “Default sort field” dropdown boxes to choose how entries will automatically be sorted once they are added to the database and click the “Save” button.
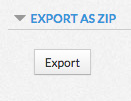
Using Presets
If you have created a database with fields, you can save it as a preset so the same fields can be loaded into a future database.
- To export your current database as a zip file, click the “Export” button under “Export as zip”. Save the file to a location on your computer.
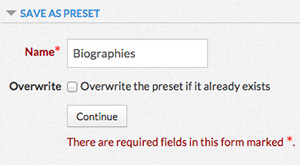
- To save your current database to the online system, type a name into the “Name” text box under “Save as preset”. Click the “Overwrite the preset if it already exists” box if you want to save over another preset, then click the “Continue” button.
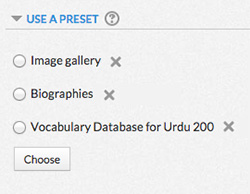
- If you want to delete a preset you’ve saved, locate it under “Use a preset” and click the X icon next to the preset’s name.
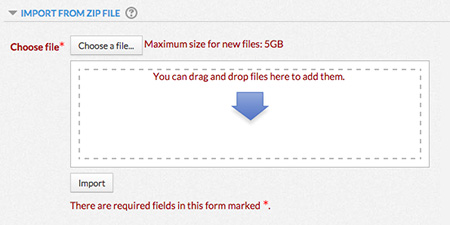
- To import a preset zip file stored on your computer, use the file uploader under “Import from zip file” to choose the zip file, then click the “Import” button. See File Uploader for more information.
- To use a preset stored in the online system, choose one from the list under “Use a preset” and click the “Choose” button.
Change the Appearance of a Database

- Click on the “Templates” button at the top of the module. More buttons will appear below the “Templates” button. Each button corresponds to a different way in which you can alter the appearance of the database. The different ways are described below:
List template – Change the appearance of the database when the “View list” button is clicked.
Single template – Change the appearance of the database when the “View single” button is clicked.
Advanced search template – Change the appearance of the form that is used to conduct an advanced search.
Add template – Change the appearance of the form that is used to add entries.
RSS template – Change the appearance of the RSS feed content for database entries.
CSS template – If you know CSS, you can use this template to add CSS code that will be used by the other templates.
Javascript template – If you know Javascript, you can use this template to add Javascript that will be used by the other templates. - Once you’ve chosen a template to edit, use the content editor on the right side of the module to change the appearance of the text and add images, etc. See Content Editor for more information.
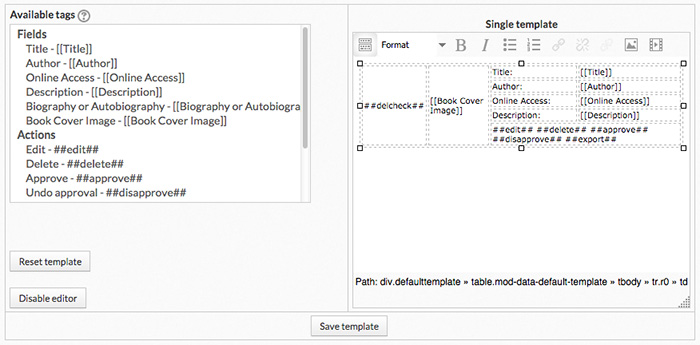
- To add a field, action or other data to the template, click on the area of the content editor where you want to add the item, then choose the item from the “Available tags” list on the left.
- If you know HTML, you can switch to HTML view while designing your template. Click the “Disable editor” button in the bottom left. You can return to the standard editor at any time by clicking the “Enable editor” button.
- When you’re finished making changes, be sure to click the “Save template” button at the bottom.
Add an Entry
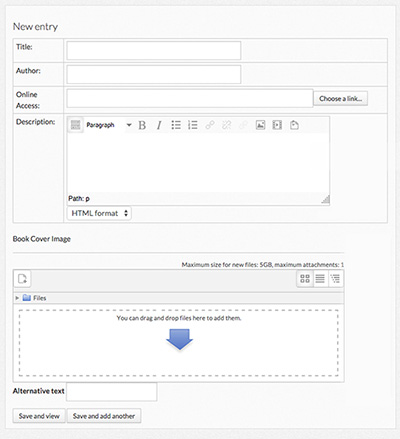
- Click on the “Add Entry” button at the top of the module.
- The fields that you created when you set up your database will appear. See Set Up a Database for more information.
- Fill in the fields. If you only want to add a single entry, click the “Save and view” button at the bottom. To continue adding entries, click the “Save and add another” button.
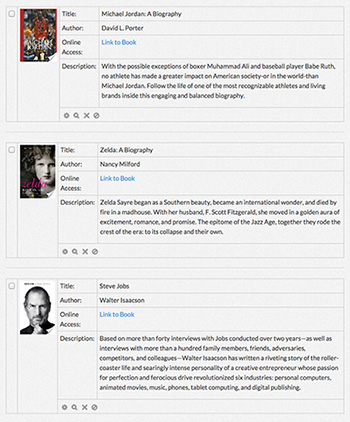
View and Edit Multiple Entries
- Click the “View list” button at the top of the module.
![]()
- Click on an entry’s gear icon to edit the entry.
- Click on an entry’s magnifying glass icon to switch to single view.
- Click on an entry’s X icon to delete the entry.
- Click on an entry’s checkmark icon to approve the entry.
- Click on an entry’s slashed circle icon to undo the approval of the entry.

- To delete multiple entries at once, click on the checkbox for each entry you want to delete and press the “Delete selected” button at the bottom.
- To select all entries at once, click on the “Select all” button at the bottom.
- To deselect all entries, click on the “Deselect all” button at the bottom.
- Search actions are available at the bottom of the page. See Search a Database for more information.
View and Edit Single Entries
- Click the “View single” button at the top of the module.
![]()
- Click on the page numbers to navigate between different entries.
![]()
- Click on an entry’s gear icon to edit the entry.
- Click on an entry’s X icon to delete the entry.
Search a Database
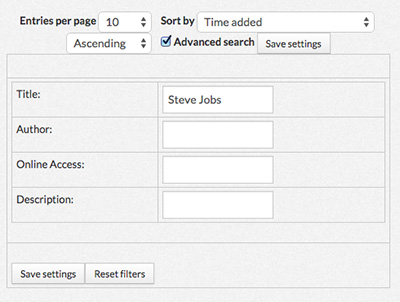
- Click on the “Search” button at the top of the module.
- Use the “Entries per page” dropdown list to choose how many entries you want to appear on one page.
- Use the “Sort by” dropdown lists to choose how you want the entries to be sorted.
- For more options, check the box next to “Advanced search”.
- When using advanced search, you can filter the entries that show up by entering text into the text boxes for the fields you want to filter. To remove the filters, click the “Reset filters” button.
- When you’re ready to search, click the “Save settings” button.
Export Data to a Spreadsheet
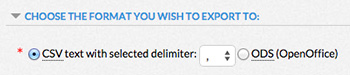
- Click the “Export” button at the top of the module.
- Under “Choose the format you wish to export to” select either CSV (can be opened in Microsoft Excel) or ODS (can be opened in OpenOffice).
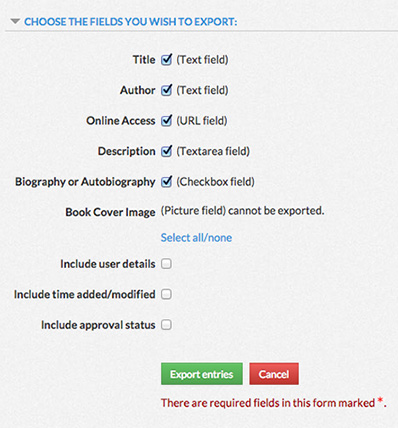
- Under “Choose the fields you wish to export” check the boxes next to the fields you want to export.
- Check the “Include user details” box if you want your spreadsheet to include columns for the user, username and email address of the person who created each entry.
- Check the “Include time added/modified” box if you want your spreadsheet to include columns for the date and time each entry was created and last modified.
- Click on the “Export entries” button to save the spreadsheet file to your computer.
- Click on the “Cancel” button to enter list view.
Working with Activities and Resources
› Add an Activity or Resource
› Move or Arrange an Activity or Resource
› Rename an Activity or Resource
› Edit the Settings of an Activity or Resource
› Hide or Show an Activity or Resource
› Copy an Activity or Resource
› Allow a Specific User Certain Permissions When Using an Activity or Resource
› Delete an Activity or Resource
› Change the Group Mode of an Activity or Resource
Add an Activity or Resource
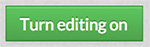
- In the upper right, click on the green button that says “Turn editing on”.
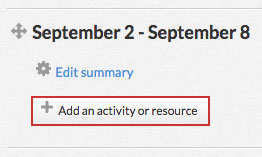
- Locate the section where you want to add an activity or resource. At the bottom of the section, click on the button that says “Add an activity or resource”
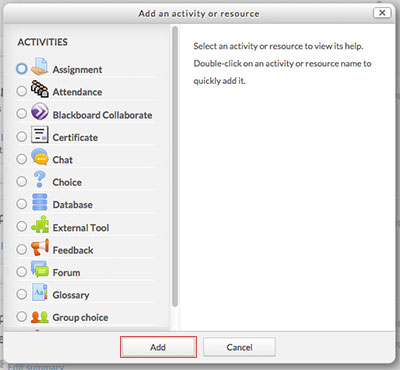
- A window will pop up with a list of activities and resources. When you click on one of the items in the left column, a description will appear in the right column. Choose the activity or resource you want and click the “Add” button.
Move or Arrange an Activity or Resource
To rearrange the order of an activity or resource:
- Click on the compass arrows icon next to the title of the activity or resource you want to move and hold down the mouse button.

- Drag the section up or down to move it to a new location.
- Release the mouse button.
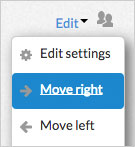
To add or remove an indentation to an activity or resource:
- Click on the “Edit” button to the left of the activity or resource.
- From the drop-down list, choose “Move right” or “Move left” next to the arrow icons.
Rename an Activity or Resource
- Click on the pen icon to the right of the activity or resource’s name.

- Type in a new name for the activity or resource
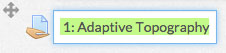
- Press enter to save or escape to cancel.
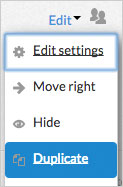
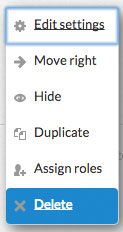
Edit the Settings of an Activity or Resource
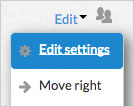
- Click on the “Edit” button to the right of the activity or resource.
- From the dropdown list, choose “Edit settings” next to the gear icon to hide the activity or resource.
Hide or Show an Activity or Resource
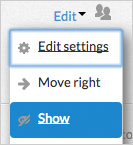
- Click on the “Edit” button to the right of the activity or resource.
- From the dropdown list, choose “Hide” next to the eye icon to hide the activity or resource.
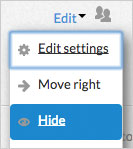
- Once the activity or resource has been hidden, return to the “Edit” menu and choose “Show” to show it again.
Copy an Activity or Resource
- Click on the “Edit” button to the right of the activity or resource.
- From the dropdown list, choose “Duplicate” next to the pages icon.
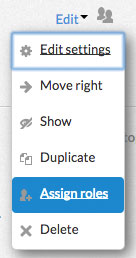
Allow a Specific User Certain Permissions When Using an Activity or Resource
- Click on the “Edit” button to the right of the activity or resource.

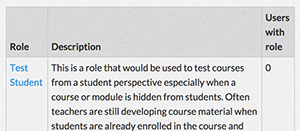
- From the dropdown list, choose “Assign roles” next to the user icon.
- Choose the type of role you want to assign to a specific user. The details of that role are listed in the “Description” column.
- Choose the specific user from your list of potential users on the right. Click the arrow buttons to add or remove them to the “Existing Users” list on the left. You can also use the search boxes at the bottom to find a specific user.

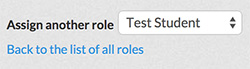
- The names in the “Existing Users” list will be assigned the role you chose on the previous page. When you’re finished, you can choose another roll to add from the drop-down list at the bottom, or you can return to the previous page by clicking on “Back to the list of all roles”.
Delete an Activity or Resource
- Click on the “Edit” button to the right of the activity or resource.
- From the dropdown list, choose “Delete” next to the X icon.
Change the Group Mode of an Activity or Resource
- Click on the user icon next to the “Edit” button of the activity or resource.

- Every time you click, the icon will change. Each icon represents a different group mode. The different group modes are described below:
 No groups – Students will not be separated into groups for the activity. In interactive activities, students will see the contributions of every class member.
 Separate groups – Students will be separated into groups for the activity. In interactive activities, students can only contribute to their group and only view their group’s contributions.
 Visible groups – Students will be separated into groups for the activity. In interactive activities, students will see the contributions of every class member, but they can only contribute to their group.